Featured image of post Adding a Database

Adding a Database

Explore database options for your Azure Static Web App - SDK vs. Database Connection, with practical implementation examples.

To re-cap our journey so far, we have used a couple of quickstart guides from Microsoft to get a static web app deployed along with an API that returns some hard coded content. In this post we’ll be adding a database and updating the API to retrieve data from it to be displayed in the front end.

Creating the database

As I wrote in Part 1 of this series, we’ll be using Cosmos DB to store our application’s data. The first step is to go to the Azure Portal to create a new instance of Cosmos DB.

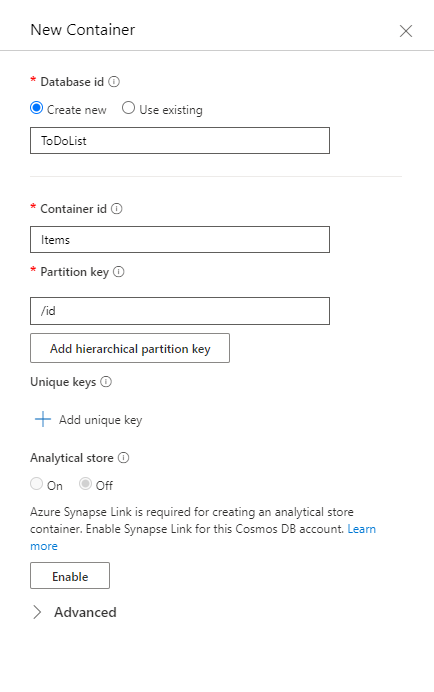
Once the Cosmos DB instance has been provisioned, navigate to the Data Explorer item in the resource menu. From here click the New Container button and fill in the details to create a new database and container.

Create a new database and container

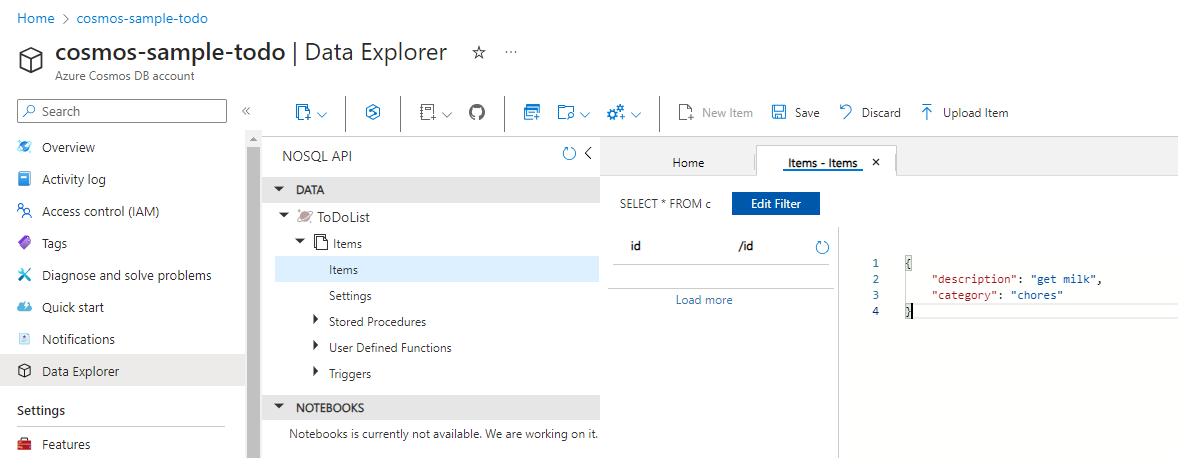
From here you can also add some sample data. Click the New Item button, enter the JSON for the item you want to add, then click Save. If you’re following along, go ahead and create a few more sample items.

Example todo item

Now that we’ve got a database created and some sample data we need to get the static web app connected to it.

Connection Options

With a static web app, we’ve got a couple of different options for working with our database:

  1. Write the back end code to work with the database using the SDK for the language of our API.
  2. Make use of the database connection feature offered by Static Web Apps.

Let’s take a look at a comparison between the two approaches.

Static Web Apps Database Connection

Based on the Data API Builder, this feature will add REST and GraphQL APIs on top of the database, removing the need to write that back end code. Once configured, it adds an API endpoint /data-api to your application, through which you can interact with the database.

This feature is currently in public preview, which Microsoft advise against using for production workloads. Since the goal of this project is to build something that could be used for production workloads, we can’t use this right now, but it’s still worth evaluating.

This tutorial provides a full set of instructions on how to connect an Azure Cosmos DB to the static web app. As usual, I won’t repeat the content here, but the process at a high level consists of:

  1. Configure database network connectivity to allow the static web app access.
  2. Install the Static Web Apps CLI locally on your dev machine.
  3. Create the database configuration file (using the SWA CLI).
  4. Create a schema file. This is needed because we’re using Cosmos DB, which is schema agnostic.

Below is an example of the database configuration file.

 1
 2
 3
 4
 5
 6
 7
 8
 9
10
11
12
13
14
15
16
17
18
19
20
21
22
23
24
25
26
27
28
29
30
31
32
33
34
35
36
37
38
39
{
  "$schema": "https://github.com/Azure/data-api-builder/releases/latest/download/dab.draft.schema.json",
  "data-source": {
    "database-type": "cosmosdb_nosql",
    "options": {
      "database": "ToDoList",
      "schema": "staticwebapp.database.schema.gql"
    },
    "connection-string": "@env('DATABASE_CONNECTION_STRING')"
  },
  "runtime": {
    "graphql": {
      "allow-introspection": true,
      "enabled": true,
      "path": "/graphql"
    },
    "host": {
      "mode": "production",
      "cors": {
        "origins": ["http://localhost:4280"],
        "allow-credentials": false
      },
      "authentication": {
        "provider": "StaticWebApps"
      }
    }
  },
  "entities": {
    "Items": {
      "source": "Items",
      "permissions": [
        {
          "actions": ["*"],
          "role": "anonymous"
        }
      ]
    }
  }
}

Here is an example of what would go into staticwebapp.database.schema.gql:

1
2
3
4
5
6
type Items @model {
  id: ID
  category: String
  name: String
  description: String
}

To work with the items in the database we send an appropriate GraphQL query to the API. The following example shows how we would list the items.

 1
 2
 3
 4
 5
 6
 7
 8
 9
10
11
12
13
14
15
16
17
18
19
const query = `
    {
      items {
        items {
          ids
          category
          description
        }
      }
    }`;
const endpoint = "/data-api/graphql";
const response = await fetch(endpoint, {
  method: "POST",
  headers: { "Content-Type": "application/json" },
  body: JSON.stringify({ query: query }),
});

const result = await response.json();
this.items = result.data.items.items;

SDK connection

Taking a more traditional approach, we would use the SDK for the database to write a data access object (DAO) to interact with the database. The API would receive requests from the front end and use the DAO to update the database.

This tutorial gives us a great example of a JavaScript DAO, which you can see below.

 1
 2
 3
 4
 5
 6
 7
 8
 9
10
11
12
13
14
15
16
17
18
19
20
21
22
23
24
25
26
27
28
29
30
31
32
33
34
35
36
37
38
39
40
41
42
43
44
45
46
47
48
49
50
51
52
53
54
55
56
57
58
59
60
61
62
63
64
65
66
67
68
69
70
71
72
73
74
75
76
77
78
79
80
81
82
83
84
85
86
87
88
89
90
91
92
93
94
95
96
97
98
99
// @ts-check
const CosmosClient = require("@azure/cosmos").CosmosClient;
const debug = require("debug")("todo:taskDao");

// For simplicity we'll set a constant partition key
const partitionKey = undefined;
class TaskDao {
  /**
   * Manages reading, adding, and updating Tasks in Azure Cosmos DB
   * @param {CosmosClient} cosmosClient
   * @param {string} databaseId
   * @param {string} containerId
   */
  constructor(cosmosClient, databaseId, containerId) {
    this.client = cosmosClient;
    this.databaseId = databaseId;
    this.collectionId = containerId;

    this.database = null;
    this.container = null;
  }

  async init() {
    debug("Setting up the database...");
    const dbResponse = await this.client.databases.createIfNotExists({
      id: this.databaseId,
    });
    this.database = dbResponse.database;
    debug("Setting up the database...done!");
    debug("Setting up the container...");
    const coResponse = await this.database.containers.createIfNotExists({
      id: this.collectionId,
    });
    this.container = coResponse.container;
    debug("Setting up the container...done!");
  }

  async find(querySpec) {
    debug("Querying for items from the database");

    if (!this.container) {
      throw new Error("Collection is not initialized.");
    }

    const { resources } = await this.container.items
      .query(querySpec)
      .fetchAll();
    return resources;
  }

  async addItem(item) {
    debug("Adding an item to the database");

    if (!this.container) {
      throw new Error("Collection is not initialized.");
    }

    item.date = Date.now();
    item.completed = false;
    const { resource: doc } = await this.container.items.create(item);
    return doc;
  }

  async updateItem(item) {
    debug("Update an item in the database");

    if (!this.container) {
      throw new Error("Collection is not initialized.");
    }

    const { resource: replaced } = await this.container
      .item(item.id, partitionKey)
      .replace(item);
    return replaced;
  }

  async getItem(itemId) {
    debug("Getting an item from the database");

    if (!this.container) {
      throw new Error("Collection is not initialized.");
    }

    const { resource } = await this.container.item(itemId, partitionKey).read();
    return resource;
  }

  async deleteItem(item) {
    debug("Deleting an item from the database");

    if (!this.container) {
      throw new Error("Collection is not initialized.");
    }

    const { resource } = await this.container.item(item, item).delete();
  }
}

module.exports = TaskDao;

The DAO is used by the functions that make up our API to work with the data in the database. In the example below, the function is receiving a GET request, using the DAO to fetch the items from the database and then returning them to the client.

 1
 2
 3
 4
 5
 6
 7
 8
 9
10
11
12
13
14
15
16
17
18
19
20
21
22
23
24
25
26
27
28
29
30
31
32
33
34
const CosmosClient = require("@azure/cosmos").CosmosClient;
const TaskDao = require("../shared/taskDao");

module.exports = async function (context, req) {
  const cosmosClient = new CosmosClient({
    endpoint: process.env.HOST,
    key: process.env.AUTH_KEY,
  });

  const taskDao = new TaskDao(cosmosClient, "ToDoList", "Items");

  await taskDao
    .init((err) => {
      console.error(err);
    })
    .catch((err) => {
      console.error(err);
      console.error(
        "Shutting down because there was an error setting up the database."
      );
      process.exit(1);
    });

  const querySpec = {
    query: "SELECT * FROM root r",
  };

  const items = await taskDao.find(querySpec);

  context.res = {
    // status: 200, /* Defaults to 200 */
    body: items,
  };
};

The HOST and AUTH_KEY variables are used for connecting to the database. HOST is simply the URI to the Cosmos DB resource and AUTH_KEY is the primary key.

For development purposes, HOST and AUTH_KEY have been set in the local.settings.json file. These would be defined as application settings on the static web app once deployed to Azure.

Application settings

To make the call to the function above, we would add something like this to the front end.

1
2
3
4
5
6
7
const endpoint = "/api/todos";
const response = await fetch(endpoint, {
  method: "GET",
});

const result = await response.json();
this.items = result;

Front End

I quickly put together a very basic UI so that we can choose between the two different DB connection types and list the data items retrieved from the database.

Todo List Front End

As far as the client is concerned the experience is no different in either case.

Conclusion

As one of the requirements of this project is that it should be suitable for production workloads, that removes any decision around which approach to take for now. I’ll continue using the SDK to connect to the database.

Once the database connection feature becomes generally available, would I switch? I’m not too sure I would. Using the SDK and writing a DAO is more code, but the database connection feature requires not an insignificant amount of configuration. Additionally, it’s free whilst in public preview, but that may not continue once it becomes generally available. It also seems like an additional, unnecessary complexity, adding another service to sit between the API and the database. At least with the SDK approach I can debug the DAO code if it’s not behaving as intended.

The components of the application are slowly coming together. There’s a front end, an API and now we’re able to pull data from a database. In the next post in the series we’ll look at using Azure AD B2C to provide the usual user workflows, such as sign up, sign in, password resets and email address verification. Once we have the ability to authenticate users, we’ll be able to start adding some security to our solution.