
At this point in the series we’ve got an application capable of sending an API request from the front end to retrieve some data from a database and display it to the user. In this installment we’ll take a look at how we can use Azure AD B2C to allow us to begin adding some security to the application.
What does Azure AD B2C do for us?
Azure AD B2C is an identity management platform that will let us manage the users of our application. It can act as a directory, storing details about the users of our application but also can perform authentication of users. Azure AD B2C supports all the usual user management processes that you’d expect when interacting with a web app, such as sign up, sign in, password reset and editing profile details.
Microsoft pitch this as a white-label solution meaning that you “can customize the entire user experience with your brand so that it blends seamlessly with your web and mobile applications”. In this post we’ll focus on getting everything working first and then look at branding the solution a little later on.
Creating the Azure AD B2C Tenant
Before we really begin, we need to make sure we’ve got an Azure Static Web App and also an Azure AD B2C tenant. We’ve got our static web app from a previous post in this series, but this is the first time we’re taking a look at Azure AD B2C.
This tutorial from Microsoft describes the exact set of steps you need to go through to create an Azure AD B2C tenant. I won’t go into any detail around this as it’s largely just a point an click exercise through the portal.
Configuring Azure AD B2C with a static web app
Now that we’ve got an Azure AD B2C tenant created we can get on with configuring it to work with the static web app. As usual, Microsoft have done a very nice job of documenting the steps in Configuring Azure AD B2C in an Azure Static Web App.
Let’s take a look in detail at the process here. For the steps below we need to make sure we’re logged into our Azure AD B2C tenant. This is a separate tenant to the usual tenant that you’ll have been working in where all of your resources are defined. The Azure AD B2C tenant exists only for the purpose of managing the users of your application.
Register the application
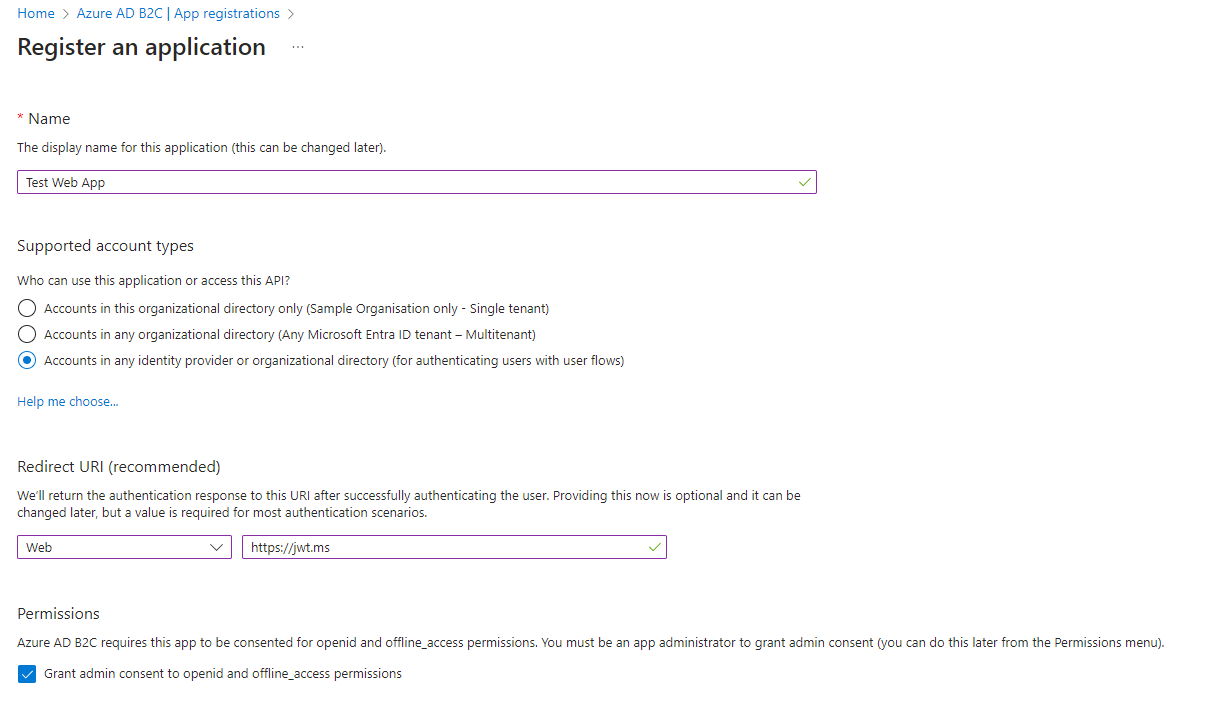
We first need to begin by registering our application. In the Azure AD B2C tenant, select the App registrations menu item and then click the New registration button. Ensure that a Redirect URI of https://jwt.ms is setup. This will be useful for testing and inspecting the token that is returned.
Next we need to create a secret for the new application. This can be done by finding the newly created application in the Azure AD B2C - App registrations page. From here, click the Certificates & secrets menu item and then click New client secret. Complete the form and make sure you take a copy of the secret while it’s displayed because after this point you can’t see it again.
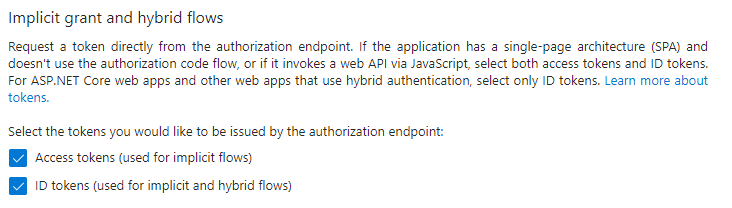
From the Authentication menu in the app registration, ensure that both the Access tokens (used for implicit flows) and ID tokens (used for implicit and hybrid flows) check boxes are checked. This will be needed during testing with the https://jwt.ms app.
Creating user flows
User flows are out-of-the-box policies that let you quickly define user experiences for many tasks around managing users’ identities in your application, such as sign-up, sign-in, password reset and profile editing. Your application redirects to a page to gather the relevant bits of information required for that flow, before directing the user back to your application. They’ll handle the basic flows, but if your requirements call for something more complex you can use custom policies. For now, we’ll just use user flows.
Microsoft provide some default screens for these experiences that can be customised in a couple of ways, which we’ll look at in a later post. For now we’ll focus on getting the flow working.
Select the User flows menu item and click the New user flow button. You’ll then have the option of creating a user flow for the various identity related tasks that you might need for your application.
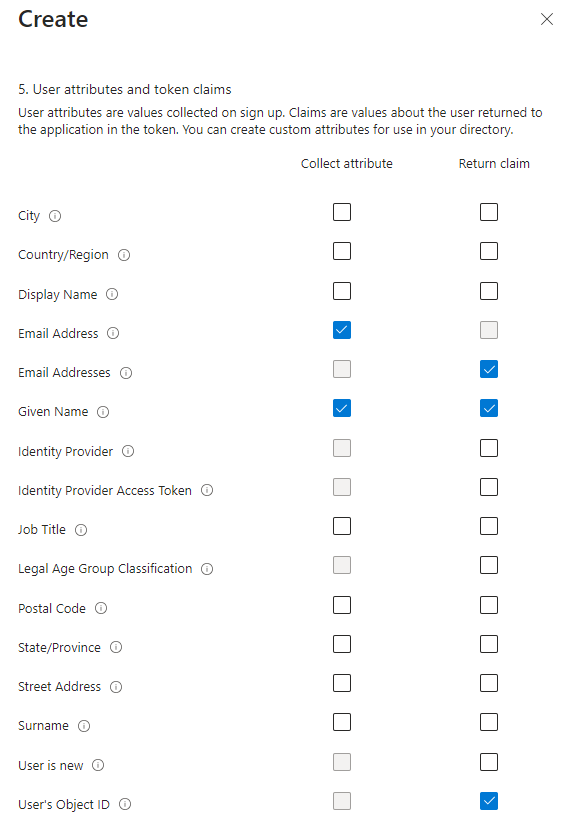
Select the Sign up and sign in user flow and complete the required fields. One important part of the configuration of the flow involves specifying the user attributes that you want to collect on sign-up and those that should be returned as claims in the token. Select a few like below and we’ll see later what impact this has.
Once the flow has been created we can test it by clicking Run user flow. Make sure that the redirect URL is set to https://jwt.ms. For the first run through you’ll need to click the Sign up now link to go through to the sign-up screen and create a new user.
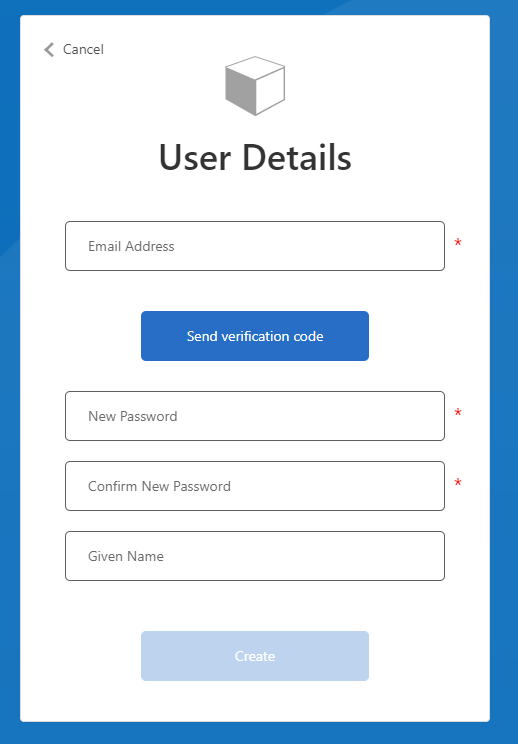
Notice here that apart from the password and password confirmation fields, the other 2 fields - Email Address and Given Name - were what we selected as attributes to be collected on sign-up.
Upon successful completion you should be redirected to the https://jwt.ms app where you can view the details of the JWT that was returned.
|
|
In addition to the standard claims usually contained within a JWT, you’ll also see the additional claims that were requested as part of configuring the user flow earlier. In our case that’s the “oid”, “given_name”, and “emails” claims.
Configure the static web app
Now that we’ve configured a user flow in Azure AD B2C we need to configure our static web app to use it. Note, the following steps will need to be completed via the portal logged into your main tenant (not your Azure AD B2C tenant).
Firstly, we need to provide the client ID and secret for the app registration that we created earlier. These values should be set as application settings in the Configuration menu for the static web app. They should have the following names:
- AADB2C_PROVIDER_CLIENT_ID
- AADB2C_PROVIDER_CLIENT_SECRET
Next we need to add Azure AD B2C as an OpenId Connect identity provider to the application. This can be done by adding an auth section to the staticwebapp.config.json configuration file.
|
|
Replace <TENANT_NAME> with the name of your Azure AD B2C tenant and <POLICY_NAME> with the name of your sign-up/sign-in policy created earlier.
Azure Static Web Apps uses the /.auth system folder for authorization-related APIs. To make this look a bit friendlier we can add some routing rules in the config file.
|
|
If you recall from the earlier post in the series when we created the API for the app, it was available via the /api/* path. Now that we’ve got authentication in the application, we can add a routing rule to restrict access to only authenticated users by making use of the built-in authenticated role. With this in place, unauthenticated users, or anonymous users, won’t be able to access the API.
Authorization
One further enhancement we should make is within the application code itself and that is to identify an owner for each todo item. Currently, calling the /api/todos endpoint will list all of the todo items in the database, regardless of who actually created them.
Accessing user information in a static web app is done in a couple of different ways. There’s the ./auth/me direct-access endpoint, which is a convenience feature to save you having to write your own function. Then for APIs, the user information is passed in the x-ms-client-principal header. The client principal data passed to the API is the same as what is available via the direct-access endpoint, except for the claims array.
Here we can see a comparison between the two. The /.auth/me endpoint returns:
|
|
Whereas the API receives the following in the x-ms-client-principal request header:
|
|
In both cases, the attributes available are the same, except for the claims array, which is present only in the response from /.auth/me.
The API does however have the userId field which is sufficient to be able to define an owner for a todo item. I first started off creating a helper class that will parse the header and convert it to a JSON object since we’ll need to be doing this across all of the functions that compose our API.
|
|
In each function we have the following code to read the request header, make use of the CurrentUser helper class and extract the ID of the current user. This is then passed as a parameter in the constructor of the taskDao.
|
|
Inside taskDao.js the userId is used in various ways depending on the operation being performed.
When we’re listing all of the todo items in the database, it’s used in the query to restrict the results to only those where the owner attribute matches the current user’s ID.
|
|
When a new item is being added, the owner of the item is set on the todo item before it’s created.
|
|
When updating an object, the method must first retrieve the object from the DB, then it compares the owner of it against the current user, throwing and error if they don’t match. If they do match, the owner is set on the new version of the item and it’s stored in the DB.
|
|
The delete method works in much the same way, retrieving the item from the DB first to check the current user is authorised to make changes to it, then the item is deleted.
|
|
API
As we’ve got a DAO with full CRUD support and we’re looking at ensuring that users can work only with their own items, now seems like a good point to build out support for the rest of the operations in our API.
To complete the API and offer complete CRUD support, we’ll have a function per operation. They’ll all receive requests on the /todos endpoint but the function.json file can be used to configure which HTTP methods they’ll handle. Below are snippets from that file that shows how they’re defined.
Create:
|
|
Read (list all todos):
|
|
Update:
|
|
Delete:
|
|
Note, in each one, the methods they support are different and the update and delete functions require that an ID be provided in the URL path too.
Conclusion
All of the pieces of the app are coming together now. We’ve got a front end, an API, a database and identity management. The latter giving us the ability to add authorization to the application. This allows us to restrict access to the API to authenticated users as well as limiting access to the individual items in the database to the currently logged in user.
In the next post we’ll look at building out the sample application into something a bit more functional.